

Download the Timesheet Portal User Guide >
You will receive an email inviting you into Timesheet Portal.
Please create your username and password to login to the system.
Once you have your login information created, you will have access to login to Timesheet Portal.
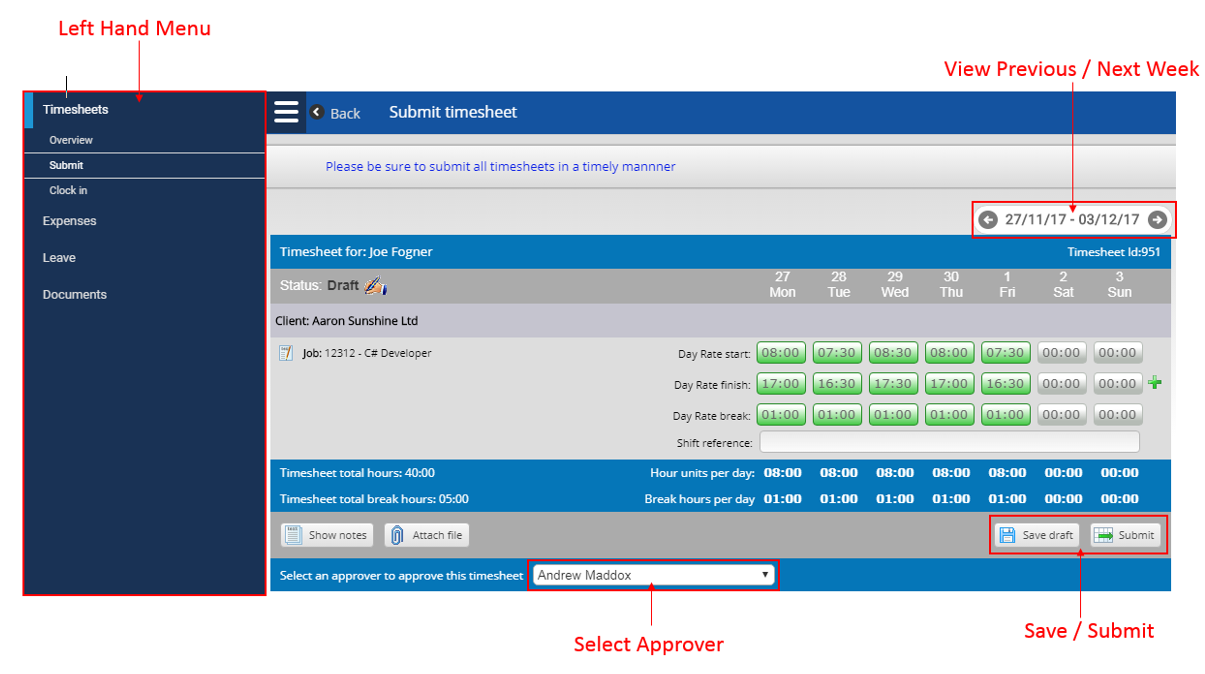
All sections in Timesheet Portal contain a left hand menu, allowing you navigate to different sections of the timesheet portal. If your screen is not wide enough to see the timesheet, you may want to hide the toolbar using the menu icon on the top right of the left-hand menu.
Your timesheet for the current week will be shown in the main area. You do not need to create a new timesheet for each week. All you need to do is move to the week you are interested in. To move between different weeks, use the grey date navigation arrows.
To move between different weeks quickly, you can also use the calendar in the toolbar which is available by clicking on the date navigation panel in the top right of your timesheet page.
The entry fields in the timesheet allow you to enter your hours worked. You should enter your time worked for each task in these fields. You can enter the time in the format HHMM, HH.MM or HH:MM. For example, to enter 8 hours and 30 minutes you could type in 0830, 08:30 or 830.
In the screenshot above, the start time, end time and total break time is being recorded. The total shown is the total hours between the start time and end time, minus the break time..
You may save your timesheet before the submission date, so that you can enter your hours worked as you go. After saving your timesheet, your hours entered will be reloaded when you next log in.
If your timesheet is rejected by your approver, you will receive an email from Timesheet Portal (and a text message as well, if this has been enabled by your agency). Your timesheet will also have the Rejected status icon and a message on top of the page to state why it was rejected.

To resubmit a rejected timesheet, make your amends as if you were submitting it the first time, and click on the Submit button.
To add notes relating to a specific day, click on time entry field for the day. If your screen is large enough, a small box will appear on the right hand side of the window, allowing you to enter your notes. If you are using a smaller display, the notes box may appear next to the time entry field. You can enter your note by simply typing any non-numeric character whilst on the time entry field, or by clicking in the notes box and entering your note there.
Once you have entered a note for a specific time entry, you will see a small yellow square in the top-right corner of the time entry field. You can edit your note by clicking back on the time entry field and editing it in the notes box. Alternatively, you can click on
Show Notes at the bottom of the timesheet. This will show all your notes created within the timesheet itself.
To delete a note, click on the time entry field which contains the note, or click on the note text in the notes table if you have previously clicked on Show Notes. To delete the note, clear the text in the notes box and click out of the box to save.
To view your past timesheets, click on Overview in the left hand navigation. This will present a table listing all your current and previous timesheets, showing basic information about the timesheet, such as its current status (submitted/approved/rejected). You can adjust the dates and apply filters on the status. If you see a status of Exported, this usually means it has been exported into your agency’s payroll / billing system. This can only happen if a timesheet is already approved.
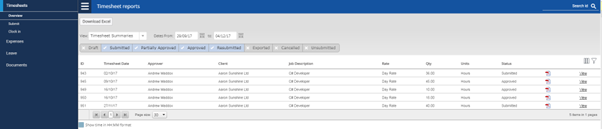
To view the full details of a timesheet, click View on the right hand side to open it, or click on the PDF icon to download it as a PDF. You can also download the list of timesheets as an Excel file by clicking on Download Excel at the top of the page.